Hello! It's been forever!


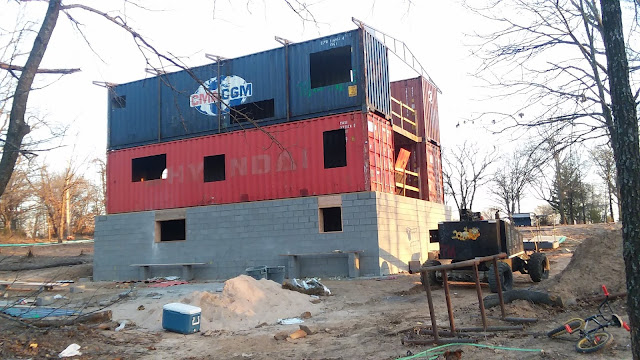
 I wanted to share our progress, specifically cutting all the holes for the doorways and windows and how we framed the open doorways with steel tubing!

We have a lot of windows and some quite huge, they were one of the few things we splurged on, we love the views of our property. Also the way we had the containers laid out, the middle rooms could have ended up feeling rather closed in, but we were able to open them up quite nicely.


You do have to be careful with the containers, because the soundness of the structure relies a lot on the walls. The corners are extremely strong, and when they stack them on the ships they are stacked on the corners. But if you cut too much of the walls away without reinforcing them you run the risk of them twisting and bending. We do have several large windows and doorways, but did not cut any that were big enough to need reinforcement.


My husband invested about $200 on a plasma arc cutter and they used that as well as a grinder to cut the holes in the metal. Later while we were installing the a/c duct work we figured out a jigsaw with a blade for cutting metal really well if you are concerned about the sparks from the other methods of cutting. 


We also had to remove part of the floor in the two rear containers to accommodate the stairways up and down. The "ground floor" container (the one between the basement and the second story) was a little cheaper because the floor had been partially ripped out. That meant they didn't have to remove the heavy plywood floor, but they still had to cut through several of the beams that run the width of the container under the floor. Oh, and they also had to cut holes in the ceiling of the basement and "ground floor" containers as well as the floor of the ground and upper levels. It was quite a project getting the openings for the stairs.


As a side note, you may wonder why I keep putting ground floor in quotation marks. It's because that level at the front was a good 6 feet off the ground before we back filled, and is still 2-3 feet above the level of the ground. And in the back it's at least 5 feet and the ground out back drops away very steeply so it feels even higher when you look out the kitchen window. We are on level with some pretty high branches in the big oak trees that almost completely surround the house.


My 14 year old son really enjoyed this part of the process. He helped a lot with the arc cutter, using his dad's welding helmet to protect his eyes. (Even though he fussed about it at first.) :) Teenagers don't think they will ever get old and wear out.


It was fun watching the different pieces come away, although after they got most of the holes cut away, the structure looked like it had barely survived a bomb raid: all empty gaping holes.


To frame the interior doorways that wouldn't have doors on them (the foyer, and from the living room to the kitchen as well as some others), we used 2x4 inch square steel tubing. At the Boxyard in Tulsa (a small shopping mall made of containers) they used 2x2 inch tubing, so I was worried the 2x4 would be too big. But as it turns out, I really like it.


They welded the tubing right onto the raw edge of the hole. It's not a continuous weld. The tubing is stitch welded to the container sides. With a continuous weld you run the risk of the heat warping and distorting the wall. We will caulk the gaps and paint them to finish it out. John also welded the seams of the tubing together and then ground his welds down to smooth them out and make a nice finish.


Next time I'll share the framing for the siding.
Comments

Post a Comment

Popular posts from this blog

Home Tour Intro

Hey there! I know it's been forever! I have so much to share! We have gotten so much done, and I'm so ready to burn my paint brushes! Haha, not really, because I have lots of other projects that I can't wait to get done once I'm finished with our house.  I am going to do a series of posts detailing different rooms with maybe some "before" pictures to remind me how thankful I am of where we've come from! (I didn't do any this time, but I plan to in the future.) I used to be very much a grey walls/stark white trim person. And I still like those colors, but for this house I have gravitated toward the warmer creams and ivory for my walls, along with medium grey for my trim. This color scheme is very rich, cozy and lends itself to my rustic French country (sortof) decorating style that also has a bit of industrial to go along.  Here are our large, beautiful, double front doors. I went with cream for the trim as well, because the exterior trim is the same co...

Home Tour pt 2

 Hey everyone! So, I decided to post one or two update pictures of our foyer. Fall is here and that means we move the wood rack into the house. My son welded up a new one, since the one we got at the (unnamed) farm store only lasted 2 seasons.  I also added a lamp, and it warms up the entryway so nicely.  We found our wood stove in northern Arkansas. From what we can figure out, it was cast in the 1930s. It is not airtight, so the temperature fluctuates quite a bit.  When you walk through the foyer into the great room, the wood stove is on your right.  The dining room is beyond it and the living room area is to your left. I have my grandma's china hutch, along with the dishes we used many years around the Sunday lunch table. I have added my own china as well. Behind the dining table is our bar. I love how it opens up the kitchen area, and makes a nice place for company to sit while I'm finishing up dinner! We have had our dining table since we had a house fire j...

Upstairs! Last post!

 Hey y'all, Wanted to share the pictures of our gorgeous upstairs. The main room is 40' long and 13 1/2 feet wide, and with the containers on each side. We left the whole room open with 10' windows on each end. Looking out these windows into the trees makes me feel like I'm living in a treehouse.  Going backwards: here is the deck we built, 17' above ground. So relaxing.  Landing at the top of the stairs. Love the trees. Bedroom with the deck. Sons bedroom. Daughters bedroom.  Large multipurpose "game room"  We painted around the "CMA CGM" logo and kept it for posterity.  That's it! House is sold. This build was a fun adventure! Please feel free to reach out with any questions! Hope this blog helps someone else along their container home journey! ✌️